Tony Worobiec : The Intimate Landscape (Part 4)
Tony Worobiec is a Fellow of the Royal Photographic Society and one of our Fotospeed photographers. He has won awards for photography both in the UK and internationally and has authored 16 books. In this blog post, Tony discusses the intimate landscape, and learning a new way to take photographs.

Be confident when shooting the intimate landscape
One of the issues many landscape photographers have when experimenting with the "intimate landscape" for the first time, is that they compare their results with their previous "big-hitter" landscapes, which often feature large and often over-photographed honey-pot locations. Learning to value the results taken in lesser known locations is certainly an important first step if you are to develop confidence as a landscape photographer.
If you are in doubt about what you have achieved, why not group several of your images together and print them onto a single sheet of paper? For example, you may be visually excited by the marks left in the sand by the receding tide, but when you view each individual image, you may wonder whether it is sufficiently interesting. By grouping several of these images together, each will serve to lend support to the other, which should help to overcome any reservations you may have. If you haven’t already, I’d strongly recommend checking the first part of this blog series out, and read through until you come to this blog.

Learn to work in mini themes
I am a great believer in working in mini-themes. When I first started photography, a more experienced fellow photographer gave me some advice which I continue to value. He invited me to imagine walking down a high-street, and then asked the question "what do you photograph"; your mind is awash with possibilities, it is almost impossible to focus on anything. Do you shoot the passing traffic, the reflections in the windows or possibly the shoppers passing by. Effectively, there is too much to consider.
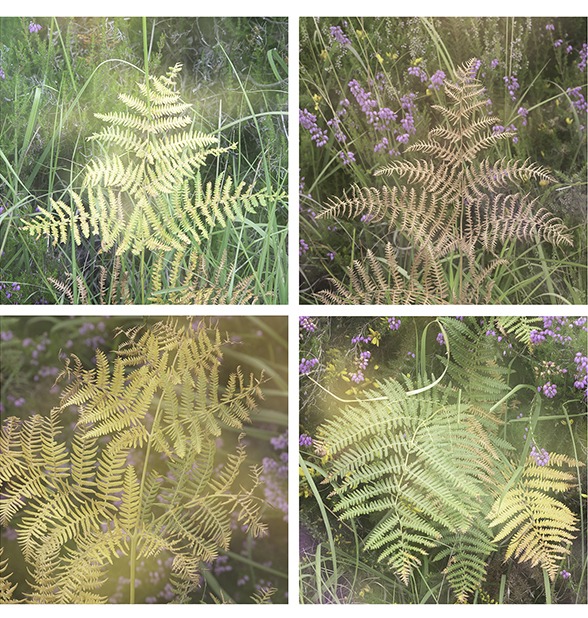
Once, however, you decide only to photograph reflections as an example, suddenly you begin to see pictures, lots of them. The same applies as you take your daily walk. By deciding on a specific day that you are only going to shoot ferns, wet leaves on a tree, or perhaps ice patterns on the ground, finding pictures becomes much easier. It seems then much more appropriate to group them together.
When grouping your work, think carefully about the order
This of course is the challenge. You may in the course of your walk take dozens of images on a very limited theme. Editing what you have will be critical with respect to the overall design. Whilst there will need to be similarities, there is little point including files that are just too similar. Every picture has a unique sense of rhythm, and by considering this, it should help you organise your composite more meaningfully.
Other aspects you will need to bear in mind are issues such as tone, colour and texture. Counterbalancing these disparate elements is in itself quite a challenge, but it is one I personally enjoy. Finally, think about the overall shape of your composite, and of course the number of images you wish to include. Normally one uses just two, three or four images together, but if you have the inclination, why not be really ambitious and try perhaps sixteen; clearly much will depend on the elements you have to work with. Also, think about the final format you wish to use, albeit square, panoramic or the traditional 3:2 format.

Grouping your images in Photoshop
Once again I am making the assumption that most of you have Photoshop, however other editing programmes should have similar methods. When sizing your images, you really need to work backwards and consider how large you want your final print to be. You then need to create a new file precisely the same size as the paper you wish to print on. To achieve this go to File > New and a dialog will appear. Dial in the size you require and then at the bottom of the dialog choose your preferred background colour; I usually select white, but why not experiment? This will become your Background Layer.
Open each of the images you wish to add and resize them appropriately, ensuring they will all fit; a little bit of maths is required here! To see the Background Layer together with the files you wish to add on screen, go to Window > Arrange, then select the format you require from the drop-down menu; it's a simple task of selecting each file in turn, and using the move tool to drag each one into place. If you have sized each of your files accurately, each should click into place relatively easily, but if you need to fine-tune, activate the file you wish to move and make the required adjustment.

Forthcoming Blogs
Having committed these last four blogs to discussing techniques, what I would like to consider in the future are the possible themes you may wish to explore. As I write, the lockdown restrictions regarding where we can photograph have been eased, although I would still suggest that you learn to value what you have close to home. With the exception of "Marks in the Sand", all the attached images have been taken on my daily walk in our local forest here in Dorset. I'm sure it is no more or less photogenic than the many locations local to you.
Check out more blogs here and for the latest news and offers, sign up to our newsletter here.


