Tony Worobiec: The Intimate Landscape (Part 2)
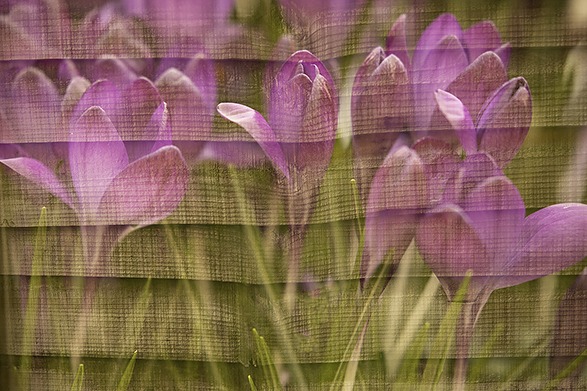
Tony Worobiec is a Fellow of the Royal Photographic Society and one of our Fotospeed photographers. He has won awards for photography both in the UK and internationally and has authored 16 books. In part 2 of this blog, Tony discusses the intimate landscape and how effective multiple exposure can be.
Learn a new skill
With this continuing self isolation, many are no doubt thinking opportunities for taking new photographs are passing by, but this is the ideal time to explore alternative techniques. Most of you are no doubt users of a DSLR camera, but how many of you have ever seriously explored the multiple exposure option? It can be a fascinating technique, allowing you to capture some wonderfully enigmatic images from your own back garden. With a bit of imagination, you could capture some great images at home. Your first task is to find where this facility is. Each marque has its own unique procedure, but if you are in doubt there are plenty of demonstrations on YouTube that offer guidance.

Getting the exposure right
Multiple exposure means exposing twice on a single frame, but providing you are using the dedicated multiple exposure option on your camera, it will automatically ensure the eventual ‘composite’ is correctly exposed. If you are shooting on film, multiple exposure is still an option, however, it will prove a little more challenging. Most film cameras offer a rewind button which allows you to take a shot, and can then keep the original in place. Unlike a DSLR, you will need to take the exposure into account. You essentially need to half it for each shoot.

What sort of subjects work?
How long is a piece of string? By multiple-exposing a frame, you are introducing an element of complexity to the design, so the principle element needs to be quite simple. Taking a shot of your entire garden isn't really going to work. I'm writing this in the middle of April, but already certain trees and plants are beginning to bloom. As I suggested in part 1 (which you can find here), this is the ideal opportunity to use your macro lens, or the macro end of your zoom, to get in close. Even elements within the house can make a fabulous source material for this kind of work. I particularly enjoy photographing shadows created by shafts of light coming through the window. If you multiple expose these, you should be able to create some wonderfully ephemeral abstracts.

Aim for a dominant and a subordinate composite
A photograph is invariably rich in detail, so layering one image over another can create a visual cacophony. Moreover, there is a certain element of serendipity about this process, because you cannot entirely anticipate the final result, which is part of its appeal. You also have the option of making numerous exposures within a single frame, but normally two is sufficient. In order to retain clarity in the overall composition, seek to make one of the exposures the dominant feature. Make the second exposure the supporting layer; this could be a layer of texture, a subtle pattern or perhaps a delicate gradation of colour. Something that often works well is when photographing a particular subject sharply in focus, and selecting another similar feature (it could be part of the same plant for example), and then throwing that second exposure completely out of focus. The overall effect can prove particularly evocative.

Multiple Exposure using Photoshop
It could be that your camera doesn't have a multiple exposure facility; Don't worry, this technique can be very easily simulated in Photoshop. Don't expect to merge two files and expect them to work; Try instead to think of the dominant/subordinate principle and see what can be achieved.
Open up your first image and make it the Background Layer. Open up your second file, drag it over the Background Layer, and that then becomes Layer 1. Which order you choose to do it depends on the outcome you are aiming for, so it is worth experimenting. Once you are happy that you have two workable layers, go to the Blending Mode and Select "Screen".
Whilst the two files will merge as if you had multiply exposed them, the subsequent composite will appear a little lighter than perhaps desired. To overcome this make an Adjustment Layer, select Curves and fine-tune as required. You also have the option of throwing Layer 1 out of focus; with this Layer active , go to Filter > Blur > Lens Blur and be guided by your own aesthetic judgment.
You can read part 1 of Tony’s multiple exposure blog here
You can read more of our helpful blogs and how-to guides here and for the latest news and offers, sign up to our newsletter here.


